
Android Tablet performs well when you first get the device. But with time passing by, it could becomes unresponsive and stuck frequently due to shortage of memory and internal storage. For those cases, wiping Android tablet is one of the best solutions out there. This is also recommended if you are trying to sell the Android tablet.
Might be you have gone through ample process to fix this issue and in some cases, you may get the positive result. But that would be a temporary solution and there is a possibility that the issue may come again. So, you must wipe Android tablet completely in order to use it more smoothly, and here you will get 5 universal ways to perform the task.
Before heading towards the methods, you must take a backup of Android tablet to avoid potential loss of important data.
First, Backup Your Android Tablet
The backup process is very simple and it enables you to secure the data of your Android tablet. Most of the users are going to save a copy in cloud storage. There is a default option available on each Android device. So it is a more convenient way to backup Android tablet. The data that you can take back up are contacts, videos, music, photos, and more. You can add a Google account for automatic backup.
If the Internet connection is not good and prefer to transfer all the data on a PC, then connect Android tablet to a PC and then take a backup manually. You have to go through each folder that contains important data. Hence, it takes more time to complete the backing up process.
g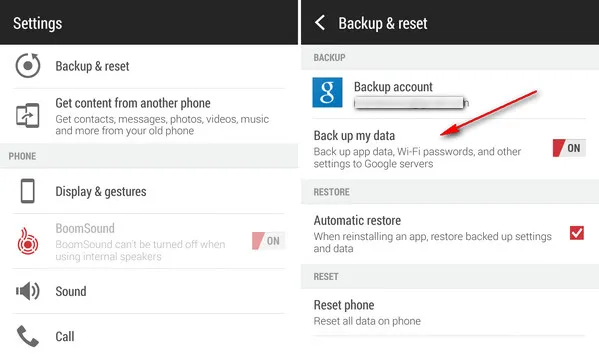
As stated earlier, here you will get 5 different methods to wipe an Android Tabelt. Some of them are conventional and some are advanced that will help you to wipe data completely. For instance, if you want to sell your Android tablet to someone, then wiping the tablet is compulsory but you can't go through the conventional method as there are chances to get the deleted data recovered, so an recommended method is provided here. Now, let's see check the steps for each solution.
Method 1: Wipe Android Tablet in Conventional Approach
This method is useful to resolve freezing issue on Android tablet and also your tablet will be wiped out in no time. This conventional method is applicable to all the brands of Android tablets, so no matter which tablet you have, the steps are more or less the same. It is simple to wipe Android tablet in this way but it is not safe! Please keep that in mind.
Step 1: Get into Android tablet desktop and further tap on Settings app.
Step 2: Scroll down the various options, look for Privacy, and then tap on it. However, if you are using an Samsung tablet, then move to Genermal Management -> Reset.
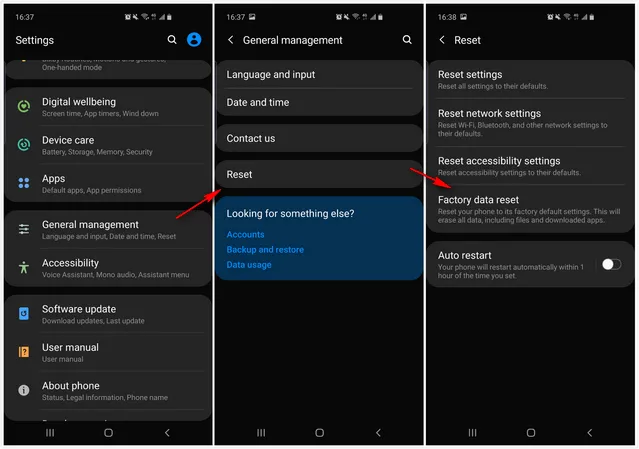
Step 3: Thereafter, you will get Factory data reset option, tap on it.
Step 4: Soon, a warning message will appear on the tablet screen stating all the data will be wiped out, just tap on Erase everything button.
Step 5: After that, the reset process will commence and once it is done, then your device will reboot.
This method is very useful when you can have full access of your Android tablet. After wiping, the storage and internal memory will be cleared out. It will be running much faster and no lag with it. However, the deleted data is still on the device and it can be pulled off by data recovery software.
Method 2: Safely Wipe Android Tablet via FoneMoz DroidErase
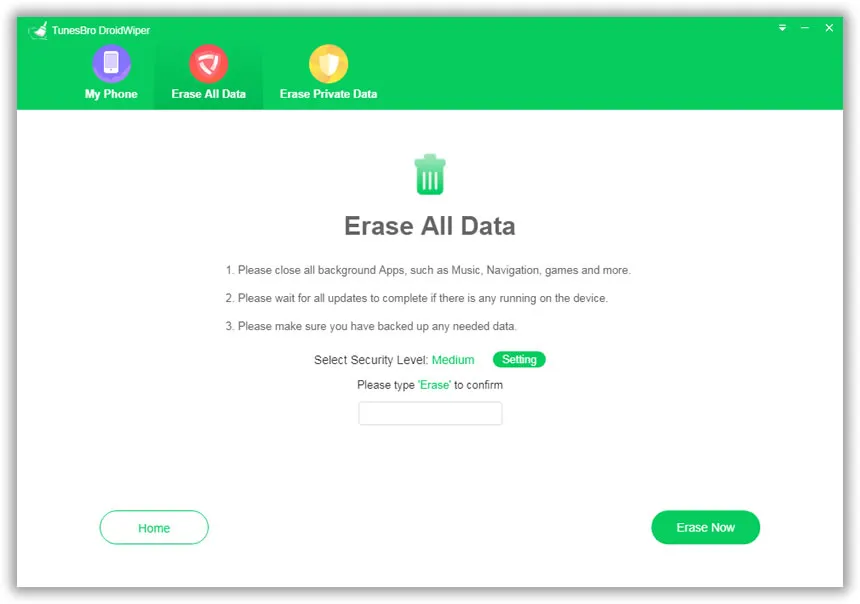
To safely wipe Android tablet without potential data leak, FoneMoz DroidErase is more capable for this task. It is an advanced and powerful software that has the ability to erase all the data from Android tablet. Most importantly, leaves no footprints. Moreover, the data removed through this software can't be recovered by any software, so it is very much helpful to protect the data stored in the hidden memory of Android tablet. So, if you want to sell Android tablet and need to wipe data on Android tablet completely, then FoneMoz DroidErase should be one of the smartest choice.
Step 1 – Get Prepared
To begin the task, you need to download and install FoneMoz DroidErase on your computer. Currently, it works well on both Windows and Mac systems.
Step 2 – Connect Android Tablet to Computer
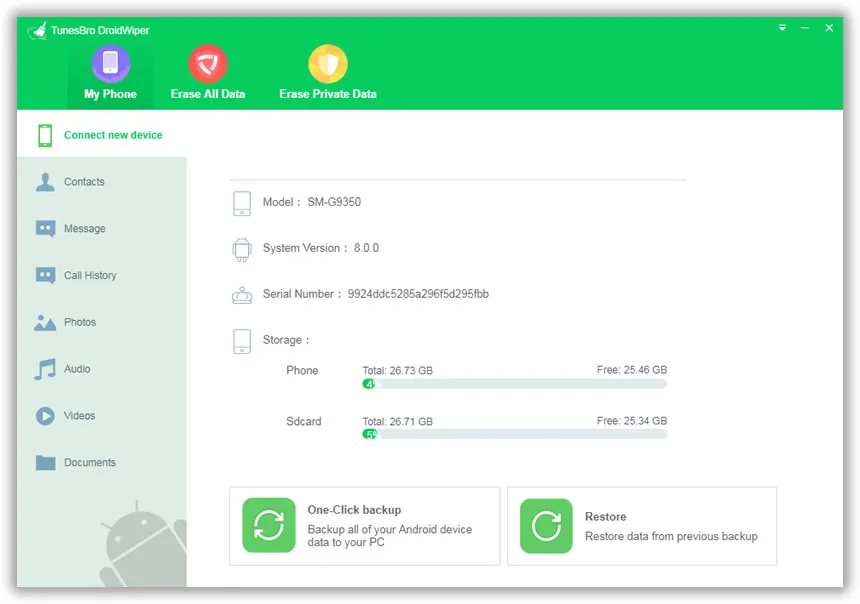
Connect your Android tablet to a PC or Mac and soon the software will start installing an Android app on your tablet, which will act as a bridget between computer and tablet. If the tablet could be detected by computer, you should turn on USB debugging on Android tablet.
Step 3 – Analyze Data on Android Tablet
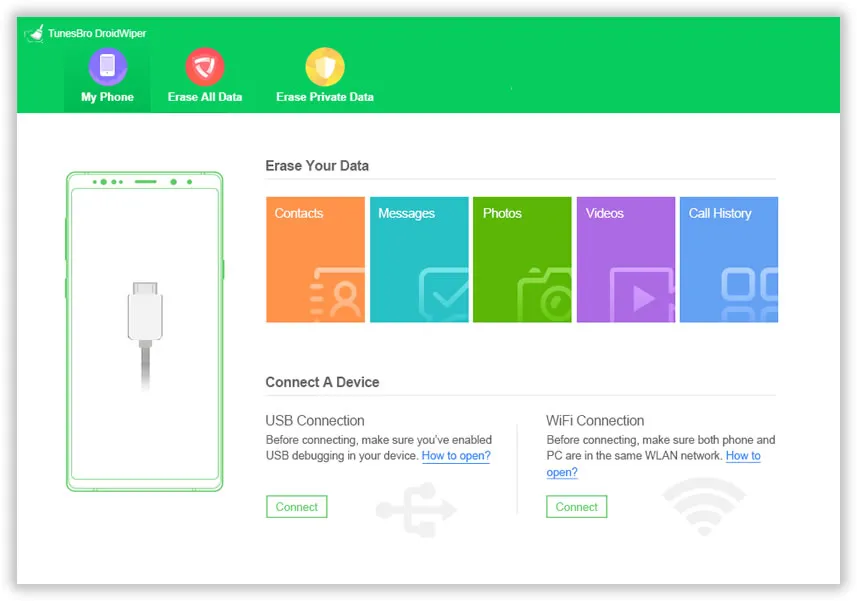
Now, launch FoneMoz DroidErase on your computer, and on the main interface, you will get 3 options at the top, click on Erase All Data. This will delete personal data as well as third-party apps from target Android tablet.
Step 4 – Start Wiping Android Tablet
Click on the Erase Now button. However, if you want to modify the security level, then you can do the same fromSettings section of FoneMoz DroidErase. Now the process is started and it will be completed within a short time.
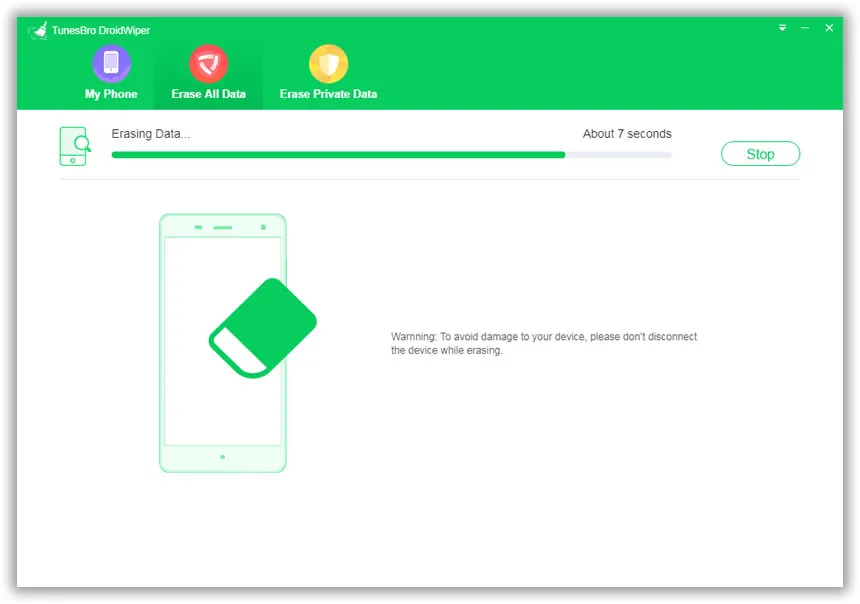
FoneMoz DroidErase is a good way to wipe Android tablets as it is powered by solid algorithms that gurantee a permanent deletion of user data. The interface is straightforward and the security layers are quite advanced that assures you the data deleted through this tool won't be retrieved.
Method 3: Hard Reset Android Tablet and Wipe Data
Hard reset is yet another method to wipe Android tablets and it is useful when your device can't boot properly. But before moving towards this method, make sure your tablet battery is full and also remove the SD card and SIM from the device. Now, let's see the methods in a detailed manner.
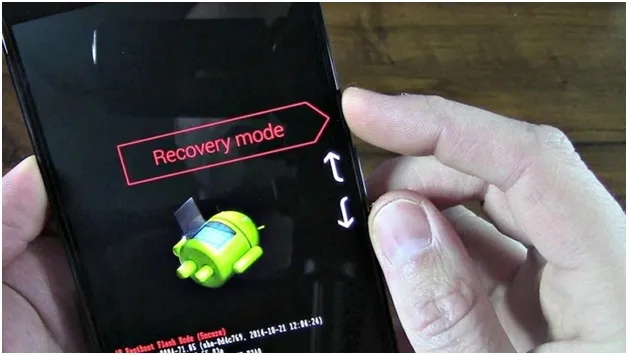
Step 1. Turn off your Android tablet.
Step 2. Press and hold the Power button together with the Volume Up button for 20 seconds. Soon, you will get a robot image which means you have landed in the Android Recovery mode.
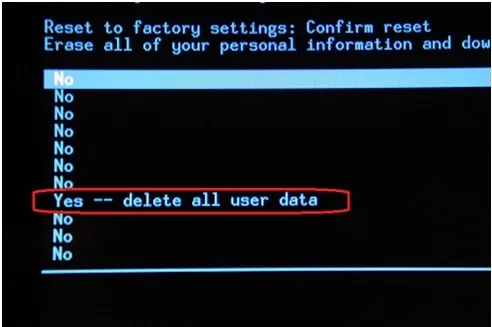
Step 3. You will get a list of options, use the arrow keys to select Wipe data/ factory reset option, and then press Power button.

Step 4. A warning message will appear on the screen and it is related to the data, just choose the Yes option and then press Power button to select this option.
Step 5. Now the data reset process is commenced and once it is finished, you will be back to the Android Recovery screen again and here you have to choose Reboot System Now option.
That's it; your Android Tablet is wiped out completely.
Though this method is pretty useful only when you need to get rid of weird issues. However, if you have planned to trade your device and want to secure your data, then this method is not that helpful because data can be retrieved. So, go with FoneMoz DroidErase to secure your data.
Method 4: Wipe Android Tablet Directly through PC
If you simply want to empty the space of Android tablet then using PC to wipe the device, you can do the job and all you need a USB cable to connect the device to a computer. Though this method will only remove the data from Android tablet and there is a much higher possibility that the stored data on the hidden memory will retain in the tablet. Also, if you did it wrongly, then the tablet may be not working properly.
Step 1. You need to connect Android tablet to a PC with a USB cable.
Step 2. Unlock your Android tablet and soon you will get the separate drive in the list of drives of your computer.
Step 3. Now, click on the device name and here you will see Internal Storage. Click on it to show up all folders on this Android tablet.
Step 4. Move to the fodlers and select the files you want to delete. Once the process is done, remove the device from the PC.
This is not an effective method to wipe an Android tablet because it takes a long time. Moreover, the inbuilt files of tablet are also presented in the internal memory that you won't be able to delete. Also, it will make your path more difficult because you won't be able to choose the desired folders to wipe Android tablet.
Method 5: Wipe Android Tablet Remotely
On modern Android tablet, it comes a new feature that enables the users wiping Android tablet remotely. It is designed for the benefit of Android users so that they can control the device remotely. If the user lost his/her Android tablet, then it is highly possible to wipe Android tablet remotely. Find My Device is the latest one offered by Google that will help you to complete the task.
Step 1. Make sure your Android tablet has remote easing feature enabled. If not, then it would be totally uselessly. And don't wast time with this solution.
Step2. Open a web browser and go to the official page of Google Find My Device.
Step 3. Sign in with your Google account and make sure it is the same account that you added to Android tablet.
Step 4. After signing in, you will get a few options at the top of the page, click on the ERASE button.
Step 5. A confirmation message will pop-up and you need to click on the Agree button. Soon, your Android tablet will be wiped out remotely.
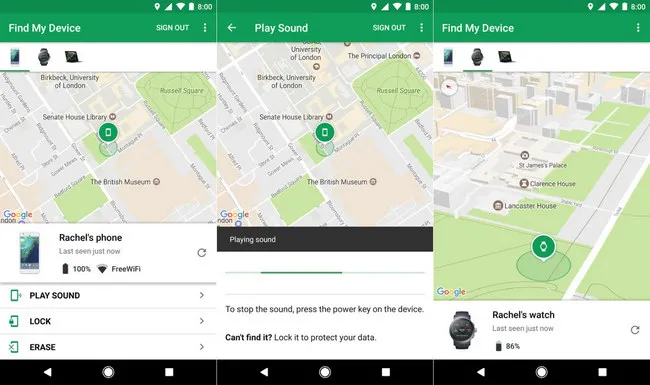
Find My Device is good for those users who have lost their device. And, you can wipe Android tablet easily by using this method. However, you will have to perform multiple tasks and if you have forgotten adding a Google account to Android tablet, then you won't be able to use this trick.
Wrap up
We have spent several hours on reviewing all the possible solutions to wipe an Android tablet. These are the five best methods based on our research. Now, all the methods are in front of you and you can choose the one as per your convenience. If you want to simply get rid of the tablet issue, then the conventional method is good for you. But if you want to trade your tablet, then better go with FoneMoz DroidErase.
Android Transfer