
Android phone or tablet is no longer a device that only used for calling and text messaging. It now becomes a powerful computing resources for storage. So when you are going to sell or give away the old Android device, make sure follow the best practice of erasing everything on Android before handing it over. If not, you're literally volunteering to be a victim of numerous cyber-crimes including identity theft, stealing of financial information or even worse. Never put yourself at such risk. To save yourself a lot of troubles, spend a few minutes reading this article about different ways to erase everything from an Android phone.
Method #1: Erase Android Phone Data by Manual Deletion
If you want to do a manual sweep of your phone, the best way would be to do it step by step after taking a full backup. After that, go into each app and start uninstalling the app. The associated data will be erased after the app deletion. You can also hook it up to your computer and accessing your folders that way, but you'll need to know which file types are possible to delete and what might be crucial system files.
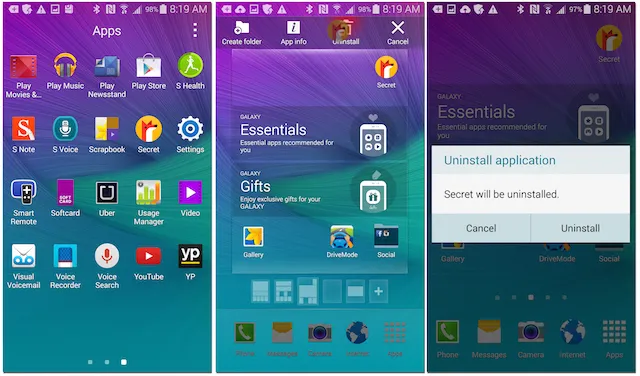
Although this might sound like the prudent thing to do, it's easier to say than to do. Manually deleting everything from the phone is as pointless as it is inefficient. Nothing will actually be removed, and anyone with data recovery software will be able to retrieve it in a short time. The reason is that something called data remanence makes all your files persist in the memory even after it is deleted. Not all data exhibits this behavior, but a lot of personal information may still be left behind from residual app files and such.
It's not a recommended way. A better option would be to use a reliable software that other Android users know and trust - a utility that lets you get the whole job done in just a few clicks.
Method #2: How to Erase Android Data from PC or Mac
Manually deletion works for certain cases but it is not secure enough as it leaves trackable history in internal storage. The second recommended suggestion is using a data erasing software on computer, which will permanently destroy all data and settings on Android phone and tablet. FoneMoz Android Eraser is a well-known utility providing military-grade data deletion for all data on your phone, wiping it clean and protecting you from digital crimes. It offers three powerful ways to erase data on your phone, including apps data, private information and full data erasure. It can successfully and permanently delete nearly a dozen different file types, and no recovery software will be able to retrieve the erased data.
Strong protection is complemented by a simple and no-nonsense user interface (UI), and the software offers a highly positive user experience (UX) for newbies and professionals alike. If you don't want your Android phone data getting into the wrong hands, this is the software you should use.
FoneMoz DroidErase
- Totally safe and complete deletion.
- 3 Data erasing engines available.
- Support 1000+ Android phones and tablets.
- Impossible to retrieve a single piece of information from the device after erase.
Step 1 – Download and Install FoneMoz Android Eraser
FoneMoz Android Eraser is available on both Windows PC and Mac. Please download the right version and install the software on a computer. Then open the program from the desktop shortcut.
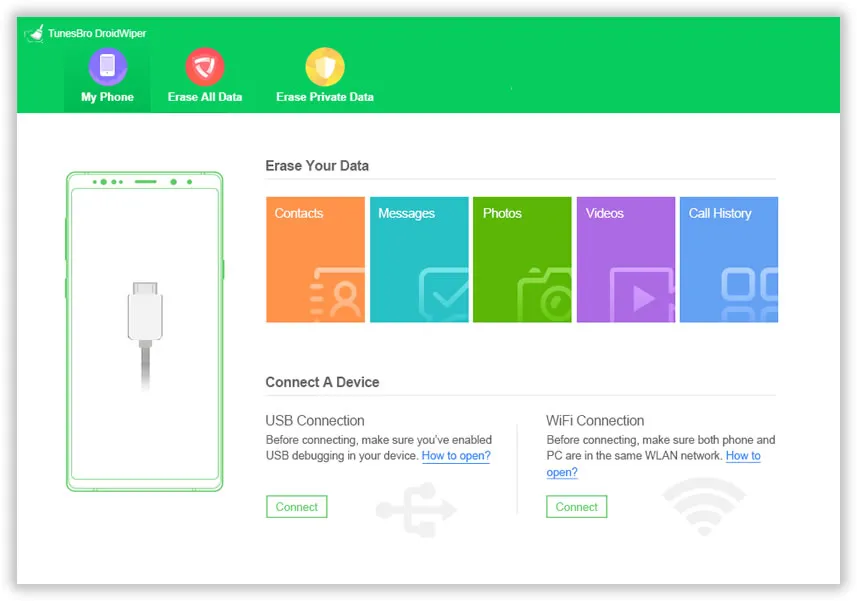
Step 2 – Connnect Android Device to PC or Mac
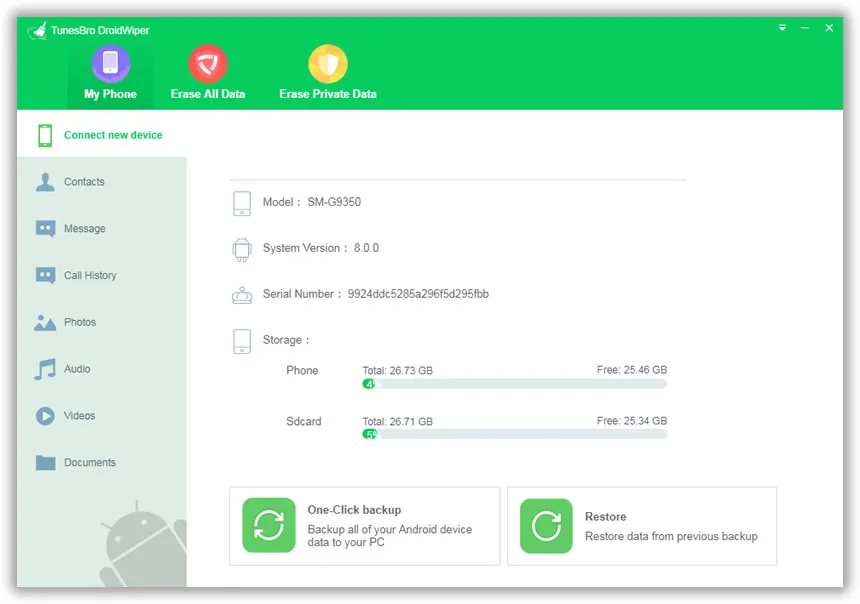
Connect your Android phone or tablet to computer with the USB cable and enable USB debugging on the device. If your connection is correct, the Android device will be detected and shown on the screen. You will also see basic specs and memory usage.
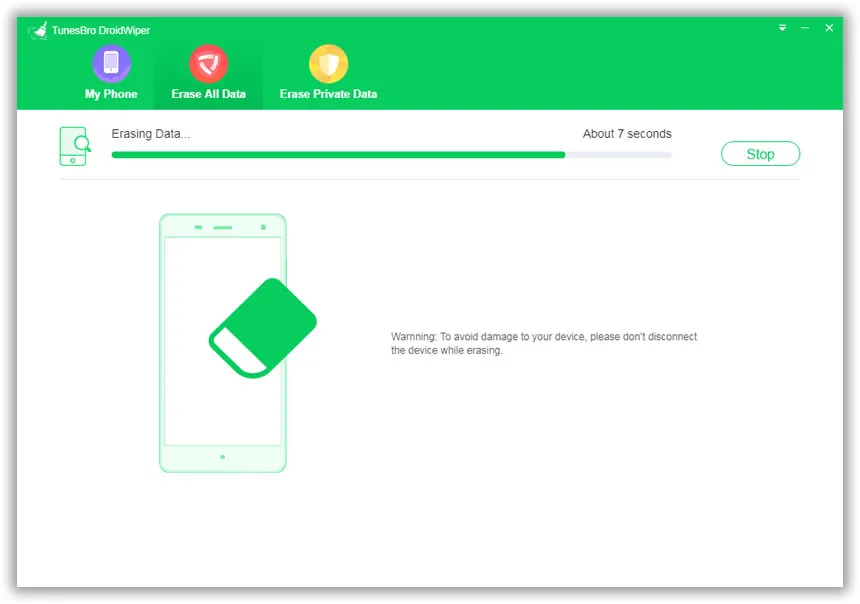
Step 3 – Choose Data Erasing Engine
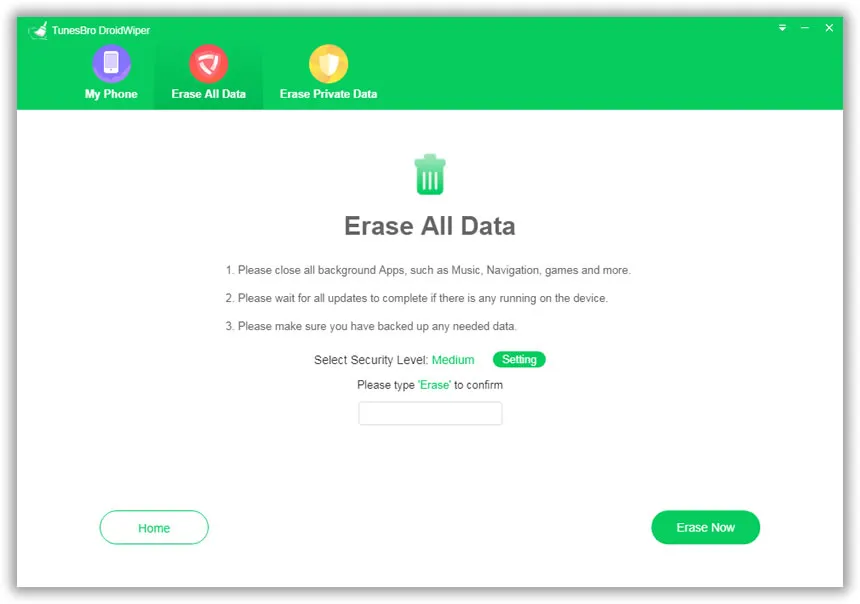
For the Erase Private Data function, simply click on Erase in the My Phone tab. You will also see a separate tab for it, as well as tabs for Erase All Data and Erase Apps Data. In this case, Erase All Data is our option.
Step 4 – Start to Erase Android Phone Data
Once you click Erase, the program will scan and display all your recoverable files. The file types are in the left panel, the data in the middle and the preview panel on the right. Select all or just the files you wish to delete and hit Erase.
Now, you set the security (deletion) level: High, Medium or Low. High takes the longest but is recommended when you have banking information, credit card details and other financial data on your phone. Low is a quick clean that overwrites all your data with a bunch of zeros, and Medium is the recommended option for most average Android users. All levels are strong enough to make the data unrecoverable by normal methods. Click OK when ready, and FoneMoz will proceed to clean your phone's memory.
Your phone is now safe to give away or sell without the fear of data theft or exposure. It is highly recommended backing up all data and then completely wipe the device before another user gets it. And keep this tool handy because we all keep upgrading our phones to new ones quite often.
Method #3: Factory Reset Android Phone to Erase Everything on Android
A quick way to erase Android data is factory reset. That means bringing it back to the initial state it was shipped when you just purchased it. This will prevent normal access to any of your data, and is a good option if you're only giving your phone to a sibling, a child or another family member. It does wipe your data to a good extent, but in some cases it doesn't work. We'll explain why after we check out the factory reset process.
Step 1. The process may vary based on phone model and firmware version, but it's essentially the same. First, go to Settings > Backup and Reset.
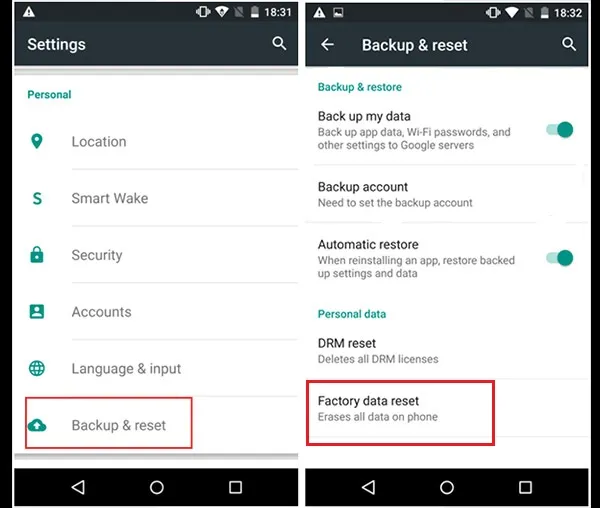
TIP: If you don't have a recent backup, take one now.
Step 2. After the backup is complete, click on Factory Data Reset in the same page. It should be in the Personal Data section of that page.
Step 3. Confirm in the next step that you want to delete all data, and proceed to do the factory reset.
The fact that factory reset is not safe enough has been proved in a test by Avast. They found that phones being sold on popular online shopping sites that were factory reset could have their data easily retrieved by Android data recovery software. That means contacts, messages and other private data open to the world and available for anyone to take. That should scare you. This is why Method 2 is recommended because no recovery is possible.
Method #4: How to Erase Android Device Remotely or Online
On Android 5.0 or later device, there is a new useful function being introduced. Android phone or tablet can be tracked and controlled remotely via online cloud service. The stock app for this is called Android Device Manager, developed by Google. Once signed in with this service, you can erase Android phone remotely. This is extremely helpful when the device was stolen or lost.
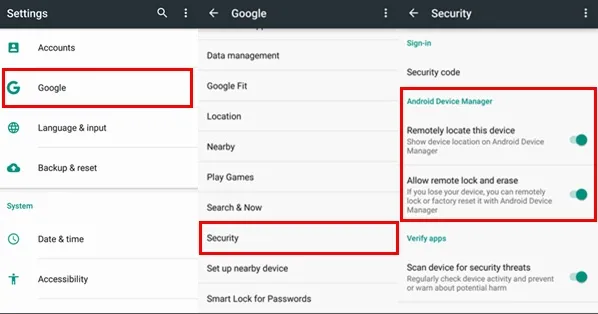
First, sign up a Google account and connect it to Android device via Settings. Now, the device is assoicated to Google account and you can see the status via Google website. Once needed, you can login Google Android Device Manager page and erase the phone remotely if it was connected to Intenrnet.
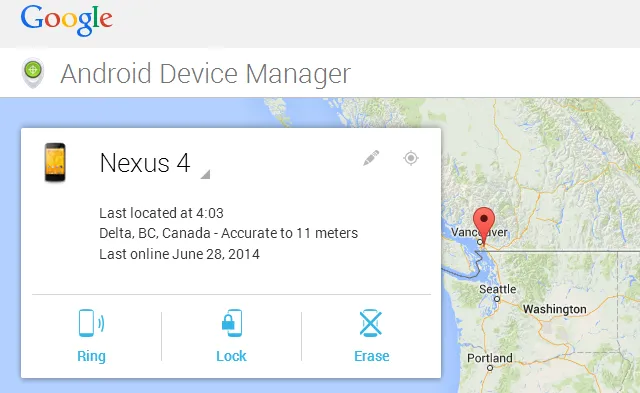
The biggest problem is that the service is not stable and the erase process would be stuck forever. So the device would be useless if failed. So be careful the Internet connection is good before doing this.
Method #5: Erase Android Phone or Tablet without Password (Flash New ROM)
A ROM is a modified version of a stock operating system as released by the manufacturer. In this case, Google. The versions originally provided to OEMs like Samsung and LG are merely barebones operating systems. They're fully functional, but they need a "skin" on top to make it more appealing to the average user. Every smartphone maker using Android will typically develop a skin for their users. There are hundreds of Android ROMs that you can download, but make sure you get it from a trusted source.
Step 1. The first step is to unlock Android bootloader and wipe the device. In a sense, the whole process begins with rooting your phone, but it's not the same thing as flashing a ROM.
Step 2. Turn off your phone and put it in recovery mode. At this point you can do a backup from the Nandroid or Backup section on your phone within recovery mode itself.
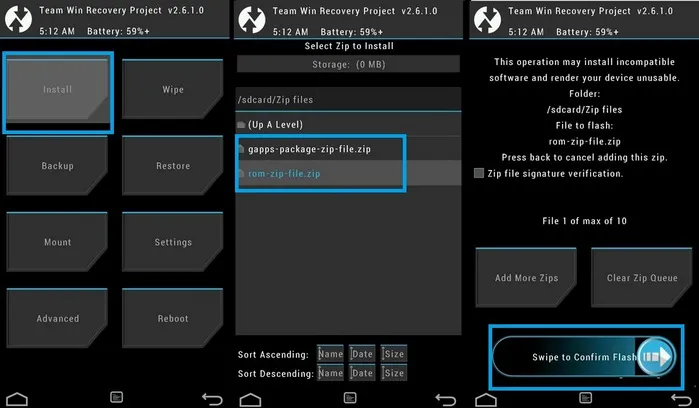
Step 3. Now, download the ROM you want to flash and save it on your device. Use Wi-Fi for faster downloading. If you need to put your phone in recovery mode again after this, do it now.
Step 4. There should be an "Install" option inside the recovery mode, but it could be called something else. Tap on it and select the file containing your ROM, and confirm the flash. It could take a while depending on various factors.
Conclusion:
The steps above are merely an outline for erasing Android phone before selling, so if you don't have any experience, it's not at all recommended. Even amateur tinkerers usually have a working knowledge of the tools and the process of flashing itself before they attempt it. If your only purpose is to wipe the phone, again we recommend Method 2 above. It's the safest way because everything becomes unrecoverable in just a few minutes.
Android Transfer