
There are two common scenario that you want to delete Android phone. First case is that your Android phone is running out of space. Second is for privacy issue. You don't want to the private data being seen by others. This is very important when you are going to sell or trade in the phone. Here, you will get 4 efficient ways to delete Android photos and all the methods will delete the photos quickly. Before that, we hope you did take a backup of your memorable moments captured by the camera on a computer or cloud. We may need them in future.
Method 1: Delete Photo Album from Android Phone
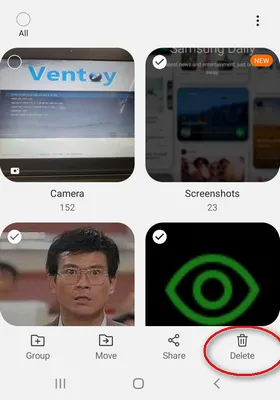
On all Android phones, photos are organized in folders and it is known as albums. Some of the command name of albums are Camera, Screenshots, Downloads, App Images. Once the album is deleted, all of the photos in it will be also deleted. You can delete all of them or just part of them according to your needs.
Step 1. Open Gallery app on Android phone and it will give you a list of albums.
Step 2. Now, tap on the three dots tab located at the top-right corner of the Gallery and then tap 'Edit' from the drop-down menu. On some modern Android phones, just long tap the album name and the Delete option will be shown at the bottom of screen.
Step 3.You will be back to the album section and you need to tap on the album that you want to delete; select them as per your solace.
Step 4. After selecting the album, tap on the 'More' button and choose the 'Delete' option. A confirmation message will appear on the mobile screen and you need to tap on 'OK'. All photos in that album is temporarily deleted.
Need to Delete Selected Photos instead of Album?
However, if you want to remove only selected photos from Android phone, then go through the steps provided below.
Step 1. Open Gallery and then tap on the respective album such as Camera, Screenshot, Download.
Step 2. In the album section, you will get the list of photos, tap on the 'More' button, and then choose 'Edit' option.
Step 3. Now tap on all the photos one by one to select them.
Step 4. After selecting the photos, tap on 'Delete' option and tap on 'Move to Trash' button to confirm the action.
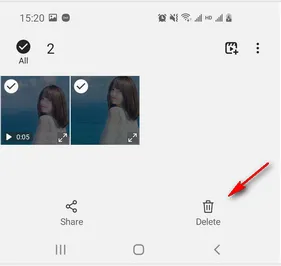
Photos being deleted in this way will be moved to Trash folder. This means they are not permanently deleted, which is like Trash Bin on computer. So this is not a complete deletion.
Method 2: Delete Photo Directly from Android Phone Usng Camera App
Camera is an in-built application on Android device that takes the picture and also shows the last snap that you took. By using this feature, you can delete the selected photos from Android phone.
Step 1. Open Camera on Android phone, it is usually located on the home screen. However, if you don't find it, then go to the menu and launch the Camera.
Step 2. Now, tap on photo thumbnail that is located at the lower-left corner of the camera app.
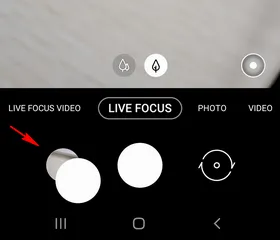
Step 3. The thumbnail will direct you to the last photo that you took. You can move to the previous photos by sliding the screen to the right end.
Step 4. Select the photo that you want and then tap on the 'Delete' icon. On the off chance, if you don't find such an icon, then tap on the 'More' icon that is located at the upper-right corner of the menu and choose 'Delete'.
Step 5. Your selected photos will be deleted immediately.
You can only delete one single photo taken by Android camera and it can be recovered from the reserved memory anytime by anyone. This is the prime loophole of this method.
Method 3: Delete Photos from Android Phone via FoneMoz Android Eraser
One biggest flaw of the above two methods is that the deleted photos are only hidderen from user view, which means they are still on the phone. Your privacy is at risk because the photos are still kept the reserved memory and if a hacker got your phone, then he/ she can recover all the photos. If you want to delete Android phone permanently, FoneMoz Android Eraser is your choice.
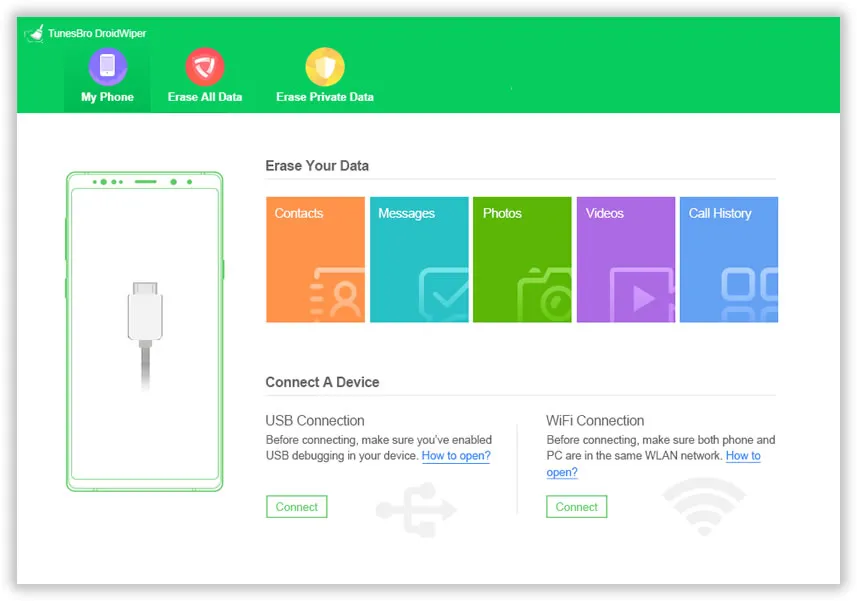
FoneMoz Android Eraser is an ultimate data erasing tool that will delete the photos completely from Android phone. This assures the deleted photos won't be recovered by any data recovery software. Isn't great? It gives complete safete and respects your privacy. FoneMoz Android Eraser is a desktop application, which means you can access the features through a computer. Now, go through the steps listed below to permanently delete photos from Android Phone.
Step 1 – Install Android Eraser Software
Go to the official site of FoneMoz Android Eraser and then download the latest version of Android Eraser. You can reach to the official site directly by clicking on the link provided above.
Move to the download folder and then click on the downloaded file to install the application.
Step 2 – Android Phone Settings
Now, hold Android phone on your hand as you need to perform a crucial task, i.e. enable debugging mode and for that, open 'Settings' on your phone, scroll down the page, and select 'About Phone'. Now, move to 'Build number and tap on it around 6-7 times to turn on USB Debugging Mode.
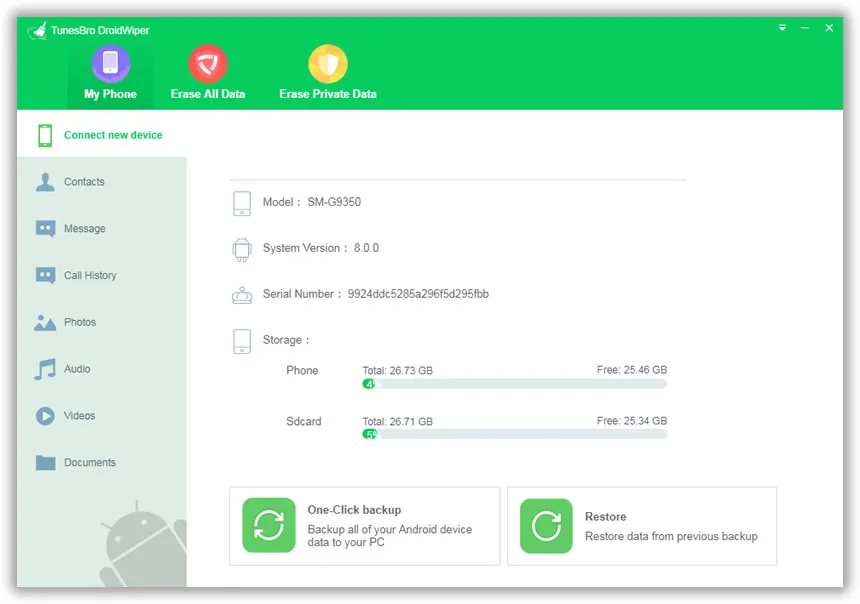
Step 3 – Scan Photos on Android Phone
Now launch FoneMoz Android Eraser tool after connecting Android phone to PC. On the home page, you will get a few options, click on 'Erase Private Data'. Soon, after that, you will get the list of tabs at the left panel, click on 'Photos'.
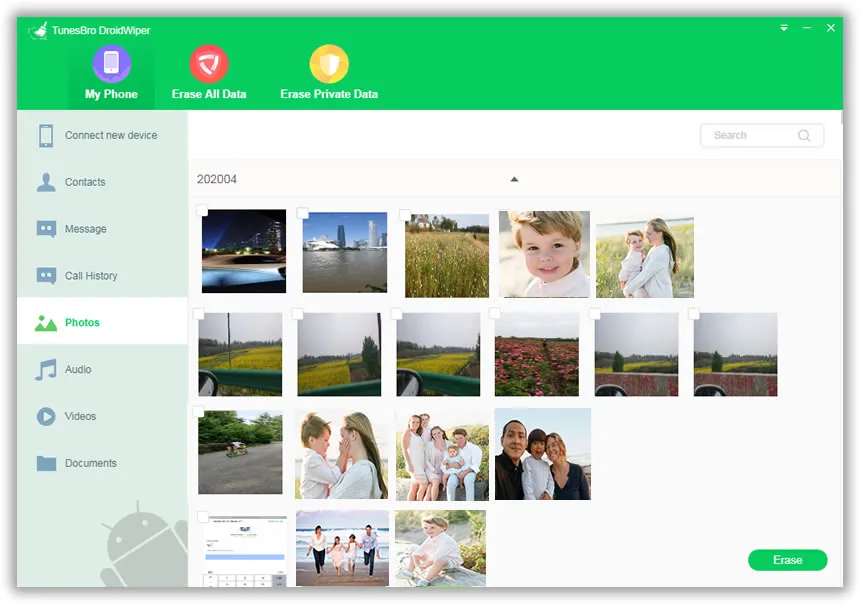
Step 4 – Delete Android Photos Permanently
Now, select the photos that you want to delete and then click on the 'Erase' button. Wait for 2-3 minutes to get the phone deleted completely from Android phone. That's it and your job is done.
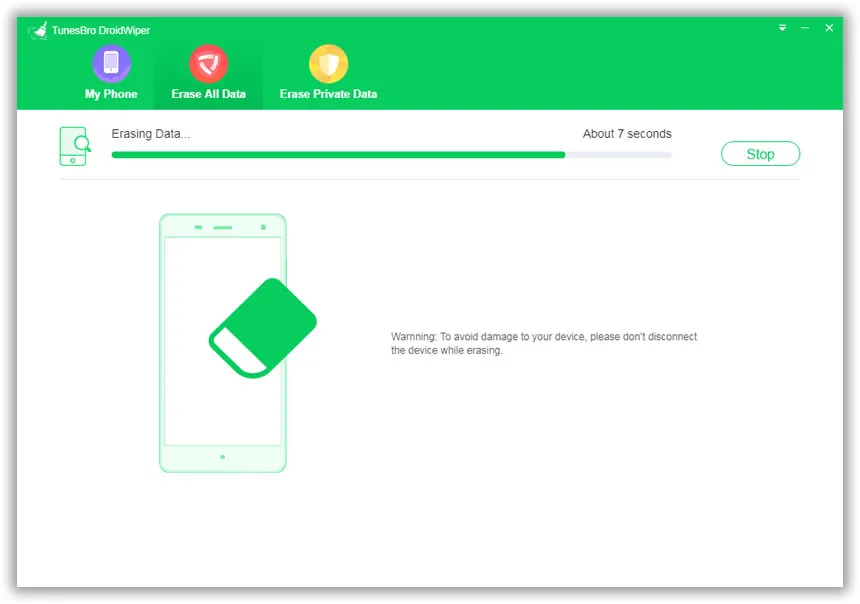
FoneMoz Android Eraser is a great tool that enables users to erase photos efficiently from Android phone. The interface is smooth that helps the users to access the features of the software easily. Using this tool, you can delete Android photos permanently, which means no recovery tool can bring back your deleted photos. It is also capable of deleting Android text messages, videos, call logs, contacts and music.
Method 4: Erase Photos on Android from Google Photos
Google Photos is an application that stores the photos on the cloud. This can't be done automatically as you need to enable 'Sync data' feature on your phone. After that, only synced photos will be saved to Google Cloud. So, if you delete photos from Google Photos, then they will be automatically deleted from your Android phone and other devices signed in with the same Google Account. So be careful about this method. It is a permanent deletion and can not reverse back.
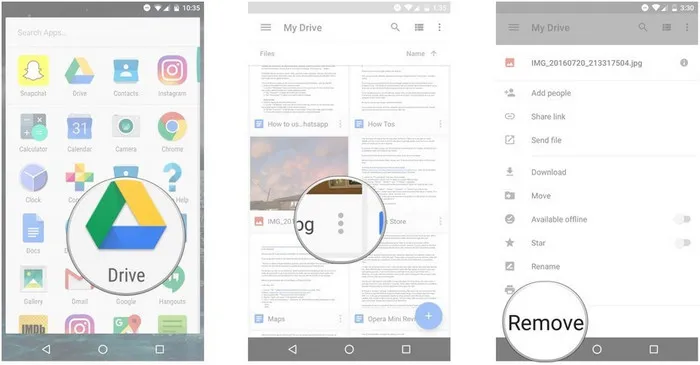
Step 1. Launch Google Photos app on Android phone and then tap on the 'More' button that is symbolized with three vertical dots located at the upper-right of the menu.
Step 2. Tapping on the 'More' icon will give you a few options, tap on 'Select'.
Step 3. Now, select the photos and then tap on the 'Delete' icon that is located at the top of the menu bar.
Step 4. Thereafter, a confirmation message will appear on the phone's screen and you need to tap on 'Move to trash'.
Step 5. The deletion process will start and once it is completed, your photos will vanish from Google Photos.
Google Photos app takes photos from your device and stores it on the cloud. This phenomenon is applicable only when you have enabled Sync data option. Sometimes, it is good that your memorable moments are on the cloud, but there is a risk as you can't rely completely on technology.
Conclusion
These are four amazing methods to delete photos from Android Phone. If you simply want to clear up your phone and want to keep the data on the cloud, then you can go with the conventional and camera app to delete photos. However, if you want to delete photos permanently, then you must choose FoneMoz Android Eraser. It is the best tool that gives you instant results without giving much stress and effort during the process.
Android Transfer