Whenever it comes to the discussion of backing up Samsung Galaxy devices, users profoundly find a great reason to pay attention to. Some way or other we all dread the manipulation of our Phone data at some point of time, thus we too always look out for an alternative to safeguard the contents of our Android phone through secured backup. Especially when it comes to excellent Android devices like Samsung Galaxy, which holds a venerable status as one of the best of its kind the risk of potential threats increases in manifold. Thus we must attempt to opt for certain ways which can actually assure us of secured and guaranteed backup. Few such methods are illustrated here with tutorials on how to apply the following methods. Hopefully they will be of great aid to backup and restore your Android if you follow the guidelines step by step as mentioned.
Part 1: Backup Samsung Phone to SIM Card and SD Card
Although we have got our SIM card and SD card within our phone, we hardly stumble upon the thought of storing data in them as a backup. But it could be a leveling idea if you know the exact measures to do so in time, wouldn’t it be? Don’t worry, that is what we are going to focus on for this very method. Let’s say for instance, we wish to back up the contacts of your Android device to the SIM or SD card. The details for the method are as follows:
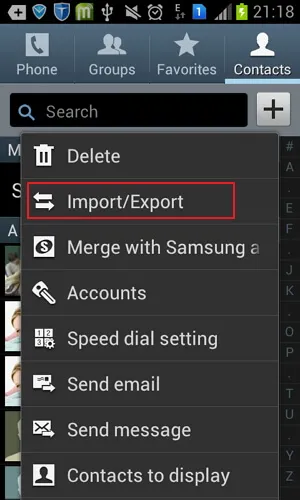
Step 1. First of all, tap on "Menu" button and then select "Contacts" app from the app menu. On the new page that it turns around, tap on "Menu" option which varies from device to device, and then choose "Import/Export" option from the context menu.
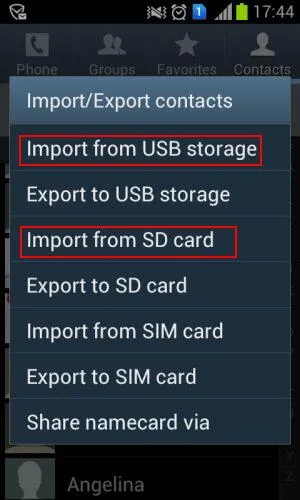
Step 3. Within an instant a new sub-menu will pop-up. Tap on either "Export to SD card" or "Export to SIM card" depending upon your preference of location.
Step 4. Next tap on "OK" button to confirm the export procedure either to SD card , USB storeage or SIM card. And your contacts will be delivered directly to the chosen spot.
Step 5. In the same way for media files, go to "All files" option, select a particular file after long pressing and then tap on "Copy" option. Tap on menu and then choose SD memory card.
Step 6. After you enter the SD card section, tap on "Paste" option and the media contents or that particular file will be copied to the SD card directly.
You can repeat the steps with other files as well one by one or you can select them all at once while exporting or copying them to save yourself the trouble.
Cons:
- Since the SDF card or SIM card commonly remains within you’re the very Android device whose data you are trying to protect, the risk of compromise is not completely eliminated.
- Anybody can easily take the phone secretly to trespass the data you backed up in your SD or SIM card.
Part 2: Backup Samsung Phone Data to Local Hard Drive
Backing up contents to your PC is one of the safest locations in entirety. The method is not that difficult, in fact it is very easy to employ. Yet for the sake of your convenience, we have provided you the manual guide on how to do the job with step by step instructions:
Step 1. Connect your Samsung Galaxy Device to your Window’s PC via USB cable. But before you do so, enable the USB debugging to enhance the procedure with debugging safety.
Step 2. When the "Autoplay" option turns up on your Window’s screen, it indicates that your device has been recognized by the computer.
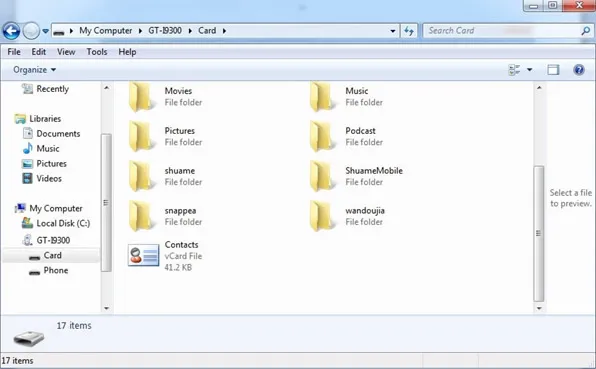
Step 3. Now go to the file explorer or "My computer" and you will get to see a separate drive for your Samsung Galaxy or you can click on "open device to view files" using Windows explorer.
Step 4. Choose your files you want to back up and then copy them by pressing "Ctrl + C" key combination. Go to the section of the Window’s drive where you wish to save the copied file and press "Ctrl + V" to paste the contents there. Then disconnect the USB cable once the work is finished.
Cons:
- Even though the procedure is quite simple to enact, but at times it is very difficult to find the content type within the phone drive shown on the PC, since the data are not sorted properly.
- Many a time due to certain malware intrusion, the Android device is not recognized, and thus the process cannot further be continued.
- Can not export text messages, contacts, call logs.
Part 3: Backup and Restore Samsung Galaxy S8/S7/S6 to Computer
Unlike the previous method where we simply connected the Samsung device to the PC via cable without any tool support, whereas here using FoneMoz Android Transfer we will do the same job,it is an well-known Android backup and managing tool that aims to provide a simple way to transfer everything between Android and computer within one-click. The most important thing is that it can scan all messages, contacts, call logs stored in your SIM card or database and export them to your computer as a readable format like HTML, doc, text and Excel. But it still shall be different on many levels. First of all, when you use this excellent tool to back up your Samsung device contents, your phone data is displayed on the PC screen in a sorted manner and you don’t have to search for a particular piece of information haphazardly like the last method.
FoneMoz Android Transfer
- Backup and restore your Android data on computer with one click.
- Transfer everything from your Android phone to computer and saver as text, html, XLS, and word format.
- Directly edit, add and delete contacts on PC and automatically synchronize to your phone.
- Install Android apps and organize apps conveniently.
- All kinds of data, be it SMS, Photos, Videos, Music, call logs, contacts can be easily backed up.
Compatible with Windows and Mac computers | Reviews (79+)
Step 1 – Download and Install Android Transfer
Connect your Window’s PC to Samsung Galaxy with the help of USB cable. Make sure to keep first the software downloaded and installed on the computer beforehand, lest it will be difficult to do so once the device gets connected.
Step 2 – Connnect Your Samsung Device to PC
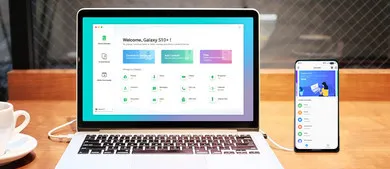
Open up the Software interface with admin rights, and you need to enable USB debugging on your Samsung device. If all connections are set right, you Samsung device shall instantly be recognized on the tool’s interface. The screen would look like this.
Step 3 – Start to Backup Samsung Galaxy Data (Take Text Messages for Example)
Now suppose you wish to backup the text messages first then click on "SMS" option from the left side bar and it will preview all the SMS contents. Choose the texts that you aspire to backup and then press "Export" button from the top head menu and the backup process will be initiated.
Step 4 – You can Also Backup All Data on Samsung Galaxy
Aside from backing up single file, you can also back up entire data on your Samsung Galaxy phone to PC. Click the Backup button on the main Window of the program, you will be asked to save a path location for the backup file and then choose while types you want to back up.
In the same manner, repeat the steps with videos, music, photos options from the left side bar until your job is done. After backing your Samsung phone, you can also easily restore the backed-up content to your original device or other Android device. There is no doubt that this FoneMoz Android Transfer would be a great Samsung backup software and protect your data from losing or deleting.
Part 4: Backup Samsung Galaxy to Google Account
The salient advantage of Android phone is that you can easily connect the smartphone phone to your personal Google account. This indicates that even if you leave your PC or the smartphone to home, you can still connect to your Google account and access all the files and bookmarks you have left in your home. Google has made sure that if you store all the data in their cloud server then these files are consolidated for you to access easily. Google use the same connection that you use to back up your phone and its settings.
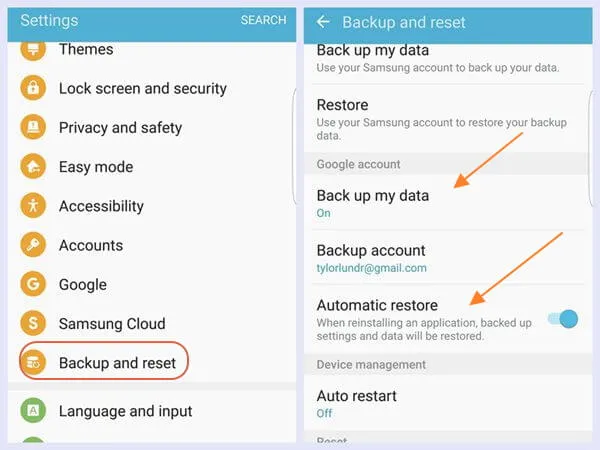
If you wish to back up the contacts, settings, apps, emails, calendar and other information on the Google account then navigate to Settings > Privacy followed by checking the "Back up my settings" & "Automatic restore". Note: Make sure to add and verify the Google account in which you want to back up the phone.
Next, go to Settings > Account & Sync, tap on the Google account you want to sync, and check all the available options. This way, your data will be stored in your easy-to-access Google account.
Then, navigate to Settings > "Account & Sync" and tap on the Gmail account that you wish to sync and tick all the options available on the screen. This way, all the data will be stored on the Google account that you have mentioned.
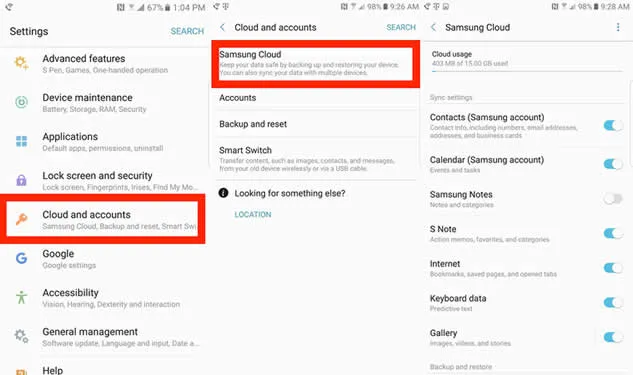
Part 5: Backup Samsung Galaxy to Samsung Cloud Drive
Samsung Cloud is exclusively available for Samsung users that allow them to back up their entire phone to the online cloud server and restore from there if needed without using any USB data cables. It can back up several types of data types such as Notes, Messages, Calendar, Mails and Contacts along with all the third-party apps that you may have installed. Also, Samsung users can easily retrieve all the files from the cloud back up to a new smartphone.
Basically, your new smartphone will be restored from the point where you have left on the old device. If you have selected the Auto Back up for Messages option then you can easily restore the messages from the old device to the new one by connecting it to the same Samsung Cloud Server account. Moreover, Samsung Cloud can also back up home screen icons and user settings for your best experience. So if you buy a new phone or lost the old device then you can even copy the shortcut icons and the layout settings.
Conclusion:
Of all the methods mentioned above, you can clearly discern that FoneMoz is one of the most dependable software to rely on. The first few methods have got certain discrepancies which eliminates the possibility of depending upon them in equal proportion at all times. Thus if you want a guaranteed output for your attempt, you better cling on to FoneMoz Android Transfer for the expected result.
Samsung Transfer